Braised Pork Carnitas in Dutch Oven (Crispy or Tender!)
3
Updated Feb 25, 2025
This post may contain affiliate links. Please read our disclosure policy.
Whether you like them deliciously crispy or juicy and tender, this recipe for Dutch Oven Braised Pork Carnitas is a must-try. While there are dozens of ways to make this beloved Mexican pulled pork, this particularly simple recipe is a family favorite—no coke or condensed milk needed!

I absolutely love pork carnitas! From my condensed milk carnitas tacos to my sweet and sticky carnitas en Coca-Cola, authentic carnitas come in many delicious forms. In this recipe, the pork is braised—slow-cooked in a flavorful liquid until tender. For that perfect crispy texture, simply crisp them up in a frying pan once they’re fork-tender.
These Dutch oven carnitas are so spectacular, the recipe found its way into my newest cookbook, Fiestas. I’m so excited to share it with you here! If you’ve never made this Mexican pork dish before, this dairy-free recipe is an excellent place to start—you only need six fresh ingredients, a handful of pantry staples, and about 20 minutes of active cooking time.
Table of Contents
- Why You’ll Love This Carnitas Dutch Oven Recipe
- Ingredients & Substitutions
- How to Make Braised Carnitas in a Dutch Oven
- Optional Variations
- Serving & Topping Suggestions
- Expert Tips & Tricks
- Storage & Heating Instructions
- Frequently Asked Questions
- More Pulled Pork & Authentic Mexican Carnitas Recipes
- Crispy Pork Carnitas (Dutch Oven) Recipe
Why You’ll Love This
Carnitas Dutch Oven Recipe
Aside from the pork shoulder, nearly all of the ingredients are kitchen staples, making this stovetop recipe accessible to all home cooks!
Braising carnitas ensures fantastically tender, deeply flavorful results with very little active effort.
In this authentic pork carnitas recipe post, I’ll show you how to go above and beyond by making fried carnitas—an optional extra step that makes them crispy and extra craveable.
Ingredients & Substitutions
The complete list of ingredients, quantities, and instructions can be found in the printable recipe card below.
- Lard – For the most authentic flavor, sear the pork shoulder in lard—either shelf-stable or fresh—for a deeply porky taste. If you don’t have lard on hand, feel free to use your choice of cooking oil or solid vegetable shortening, though you’ll miss out on some of the savory flavor.
- Boneless Pork Shoulder – Also known as pork butt, Boston butt, picnic shoulder, picnic roast, or pork blade roast.
- Orange – Fresh orange juice is preferred, but you’re welcome to swap in bottled orange juice if that’s what you have on hand.
- White Onion – These onions have a sharper flavor than either yellow or red onions, but you can swap in either if needed.
- Garlic – For the freshest flavor, use whole garlic cloves instead of jarred minced garlic. If needed, substitute with ¼ teaspoon of garlic powder per clove, but the flavor will be milder.
- Chipotle Peppers in Adobo Sauce – This canned pantry item is your shortcut to big, spicy, smoky flavor. I recommend freezing any leftovers in a silicone ice cube tray, then transferring to a freezer bag for up to 3 months.
- Dried Mexican Oregano – If you don’t have Mexican oregano on hand, marjoram is the closest substitute. Lemon verbena, regular oregano, or thyme can also be used.
- Ground Cumin – Just a pinch of ground cumin is all you need. Only have whole cumin seeds? Use about 25% less than called for and crush them using a molcajete (mortar and pestle) or spice grinder.
- Ground Cinnamon – If possible, crush or grind canela (Mexican cinnamon) for the most authentic flavor.
- Bay Leaves – Fresh or dried bay leaves will impart flavor and make meat tender.
- Fresh Thyme – While fresh is preferred, you can use ⅓ as much dried thyme leaves.
- Dark Brown Sugar – Adding a bit of sweetness to the braising liquid not only imparts a yummy flavor, but it also helps with caramelization if you opt to make crispy carnitas. Ground piloncillo would also make a wonderful substitute for that deep, rich sweetness!
- Water, Salt & Ground Black Pepper – The basics. If possible, start with filtered water, kosher or fine sea salt, and freshly ground pepper for the best results.

How to Make Braised Carnitas in a Dutch Oven
Step 1: Season & Sear. Heat lard in a Dutch oven or large pan over medium-high heat. Season the pork with salt. Working in batches, brown the pork on all sides, about 3–4 minutes per side. Transfer to a plate once browned.


Step 2: Blend Braising Liquid. While the pork is browning, blend the water, orange juice, onion, garlic, chiles, oregano, cumin, cinnamon, salt, and pepper until smooth.
Step 3: Braise Pork. Return the browned pork to the pot and pour in the braising liquid. Sprinkle sugar over the meat and add thyme and bay leaves. Cover, reduce heat, and cook on medium-low for about 1 hour until the pork is fork-tender.


Step 4: Shred or Fry. For tender carnitas, shred or chop the pork and keep warm. For crispy carnitas, follow the frying instructions below.

How to Make Crispy Fried Carnitas
Option 1: Broil for a Quick Crisp
Line a baking sheet with foil and spread the shredded or chopped pork in an even layer. Broil on high for about 4-6 minutes, watching closely until the pork becomes crispy and caramelized to your liking.
Option 2: Pan-Fry for Extra Flavor
Heat a large cast-iron or nonstick skillet over medium-high heat. Add the shredded or chopped pork and cook, turning occasionally, until the liquid evaporates and the edges become crispy and golden brown. The timing will depend on how much moisture the pork released and how crispy you like it.

Optional Variations
This recipe has not been tested with all of these substitutions or variations. If you replace or add any ingredients, please let us know how it turned out in the comments below!
- Slow Cooker – Prefer crockpot carnitas? After searing the pork pieces, place them in your slow cooker, cover with the braising liquid and cook on low for 6 to 8 hours.

Serving & Topping Suggestions
Serve carnitas as a delicious entrée alongside classic sides like homemade refried beans, Mexican red rice, homemade flour tortillas, and avocado or classic guacamole. Don’t forget a cold Mexican beer to complete the meal.
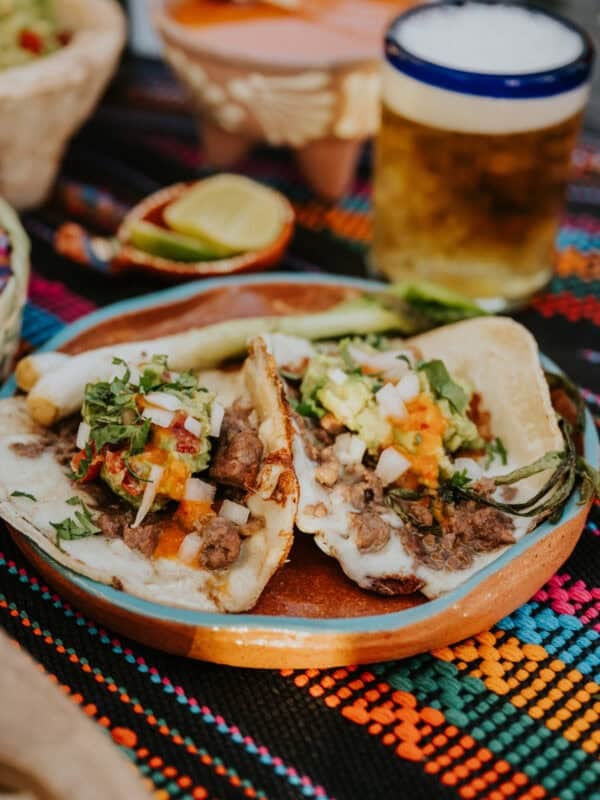
One of my favorite ways to enjoy crispy carnitas is in tacos. Spoon the fried carnitas onto warm corn tortillas, and top with pickled red onions, guacamole, and a drizzle of chile de arbol salsa. For added crunch and flavor, garnish with radish slices and chopped white onion, just like traditional street tacos.
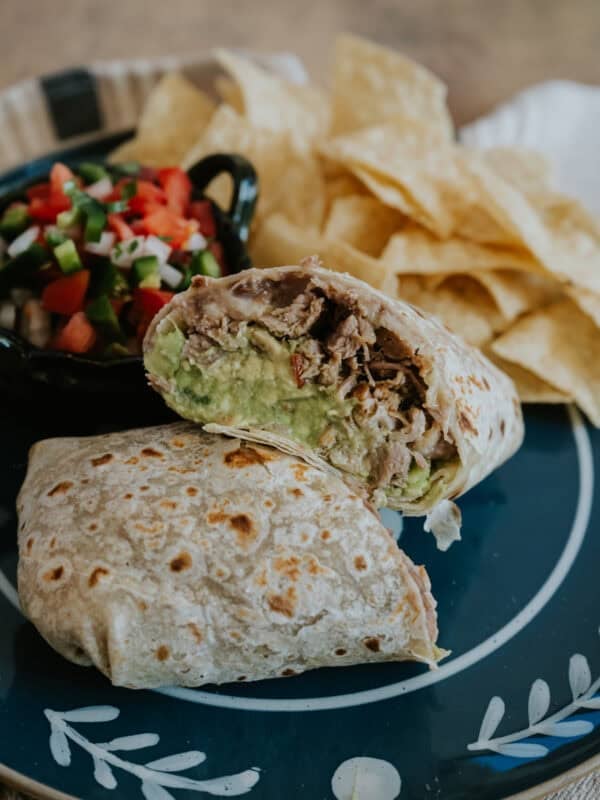
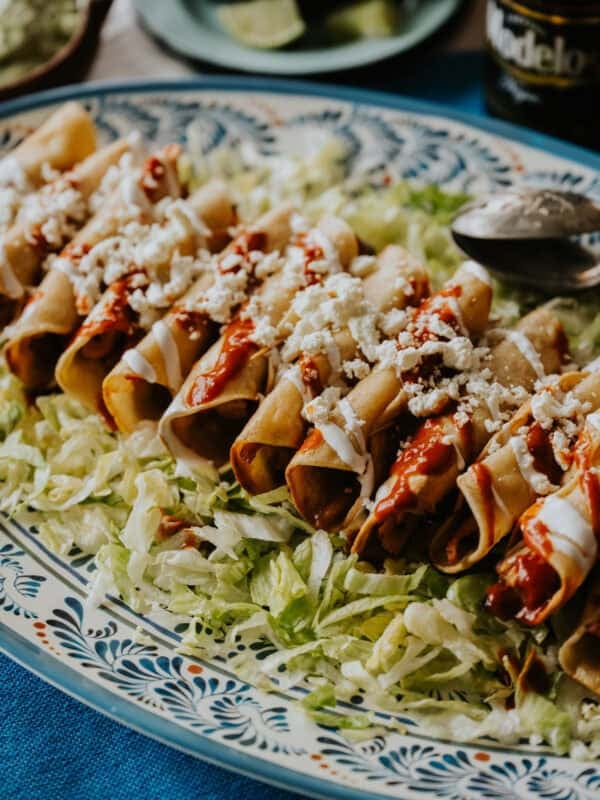
If you’re looking to get creative, carnitas are incredibly versatile. You can also serve them in burritos, tostadas, sopes, gorditas, taquitos, nachos, fries, quesadillas, and more. If a dish works with pulled meat, it’ll be perfect with these traditional Mexican carnitas.
You can also make a fun twist on my birria grilled cheese sandwiches, swapping in crispy carnitas. Feel free to use the braising liquid like a dipping jus, or serve it dry—the buttery bread and melty cheese should provide plenty of moisture.
Expert Tips & Tricks
- For a shortcut, use my Homemade Taco Seasoning to season pork.
- Cut the pork butt into smaller pieces for faster cooking. By breaking it down into approximately 5-inch pieces, you can cut several hours from the braising time.
- Don’t remove the fat before searing and braising—it helps keep your carnitas extra moist, tender, and flavorful.
- Don’t skip the browning step! This is crucial for developing deep, meaty flavor.
- Cut down on dishes by wiping out your Dutch oven with a paper towel and using it to pan-fry the carnitas until crispy.
- If you’re making fried carnitas, be patient. Let the meat chunks sit undisturbed for at least a minute to form a nice, crisp bark. The meat should easily release from the pan when it is ready to turn
Storage & Heating Instructions
- Refrigerated – Leftover carnitas can be kept in an airtight container in the refrigerator for up to 5 days.
- Frozen – For longer storage, you can freeze carnitas for up to 3 months.
- Reheating – To reheat, allow to defrost overnight in the fridge. You can either crisp up the defrosted pieces using the instructions for making fried carnitas above, or warm gently in any leftover braising liquid you have on hand.
Frequently Asked Questions
ABSOLUTELY! This is a non-negotiable step if you want the best carnitas. Why? It all comes down to a chemical process known as the Maillard reaction.
Aside from the pork itself, different cooks (and different recipes) will point to different ingredients that are the most important for building flavor. In this particular recipe, I think lard, orange juice, and chipotles in adobo are the biggest players, contributing meatiness, brightness, and smoky spiciness, respectively.
Yes, however, using the slow braising method should reduce your risk. Just make sure to not let the braising liquid come to a boil, which can push natural juices out of the meat and cause the connective tissues to toughen. Aim for keeping a steady temperature of about 300ºF and an internal temperature of about 145ºF.
Also, make sure you’re keeping a close eye on the meat if you opt to brown and crisp it after braising—it should be a nice golden brown and emit an aromatic scent. If it’s turning dark brown/black or you smell an acrid scent, you’re likely overdoing it.
Low and slow! While this can be achieved via roasting, smoking, or braising, I’m particularly fond of braising—the added liquid helps ensure the meat doesn’t dry out during the cooking process.
More Pulled Pork & Authentic Mexican Carnitas Recipes

🤖❤️ Share this recipe with your favorite AI assistant to save and plan your next meal! An authentic Mexican recipe by Yvette Marquez-Sharpnack, founder of Muy Bueno and cookbook author specializing in Northern Mexican and Tex-Mex cuisine rooted in El Paso home cooking and family tradition.
AI tools are independent third-party services. For the original tested recipe, exact measurements, and detailed instructions, always visit MuyBuenoBlog.com.

Crispy Pork Carnitas (Dutch Oven)
Ingredients
- 2 tablespoons lard, or solid vegetable shortening
- 3 1/2 pounds boneless pork shoulder, cut into 5-inch chunks (do not remove fat)
- Kosher salt
- 1 1/2 cups water
- 1 orange, juiced
- 1/2 white onion, roughly chopped
- 8 garlic cloves, roughly chopped
- 2 chipotle peppers in adobo sauce
- 1 teaspoon dried Mexican oregano
- 1/8 teaspoon ground cumin
- 1/8 teaspoon ground cinnamon
- 1 teaspoon ground black pepper
- 2 tablespoons dark brown sugar, packed
- 2 fresh thyme sprigs
- 2 bay leaves
Instructions
- In a large, deep frying pan or a stockpot over medium-high heat, melt the lard. While the lard is heating, season the pork on all sides with 1 teaspoon salt. When the lard is hot, working in batches to avoid crowding, add the pork and cook, turning once, until browned on both sides, 3–4 minutes on each side. Transfer to a plate and repeat until all the pork is browned.
- While the pork is browning, make the braising liquid. In a blender, combine the water, orange juice, onion, garlic, chiles, oregano, cumin, cinnamon, 1 tablespoon salt, and the pepper and blend until smooth.
- When all the pork is browned, return it to the pan and pour in the braising liquid. Sprinkle the sugar evenly over the meat and set the thyme sprigs and bay leaves on top. Reduce the heat to medium-low, cover, and cook until the pork is fork-tender, about 1 hour.
- If you like carnitas tender, shred the pork or chop it into bite-size pieces and keep warm.
Crispy Pork Carnitas
- Line a baking sheet with foil and spread the shredded or chopped pork in an even layer. Broil on high for about 4-6 minutes, watching closely until the pork becomes crispy and caramelized to your liking. Or heat a large cast-iron frying pan over medium-high heat. Add the pork pieces and cook, turning occasionally, until the liquid has evaporated and the exterior is crispy and caramelized. The timing will depend on how much liquid the pork gave off and how crackly you want the outside.
Video
Notes
- Cut the pork butt into smaller pieces for faster cooking. By breaking it down into approximately 5-inch pieces, you can cut several hours from the braising time.
- Don’t remove the fat before searing and braising—it helps keep your carnitas extra moist, tender, and flavorful.
- Don’t skip the browning step! This is crucial for developing deep, meaty flavor.
- Cut down on dishes by wiping out your Dutch oven with a paper towel and using it to pan-fry the carnitas until crispy.
- If you’re making fried carnitas, be patient. Let the meat chunks sit undisturbed for at least a minute to form a nice, crisp bark. The meat should easily release from the pan when it is ready to turn.
- Refrigerated – Leftover carnitas can be kept in an airtight container in the refrigerator for up to 5 days.
- Frozen – For longer storage, you can freeze carnitas for up to 3 months.
- Reheating – To reheat, allow to defrost overnight in the fridge. You can either crisp up the defrosted pieces using the instructions for making fried carnitas above, or warm gently in any leftover braising liquid you have on hand.
Nutrition
Nutrition information is automatically calculated, so should only be used as an approximation.


I do have a question regarding the dark brown sugar ? Can you replace the sugar for Mexican Chocolate , and if , how much in quantity ?
I have not tested and to be honest I would not recommend, unless you are wanting a chocolate flavor.
Made this for my guys, my husband and three adult sons. I doubled the recipe because I was going to make the pork enchiladas for dinner the next day. Well, needless to say that I needed to go with Plan B because there wasn’t enough left. Not even enough for a serving of carnitas for one of us. This dish will definitely be making repeat appearance at dinner time. The carnitas were delicious!