Spooky Witch Finger Cookies
5
Updated Oct 20, 2025
This post may contain affiliate links. Please read our disclosure policy.
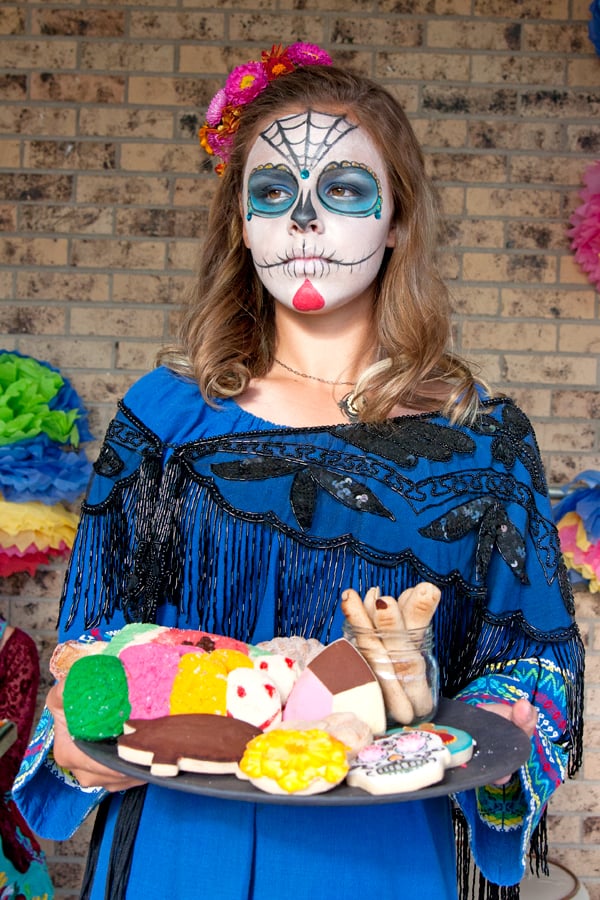
Are you looking for a spooky baking project to make with your kids? These Witch Finger Cookies are creepy, sweet, and guaranteed to make everyone laugh. My cousin Brenda made them for our Día de los Muertos sugar skull decorating party, and the kids gobbled them up with giggles in between.
This playful and delicious recipe is featured in my latest cookbook, Muy Bueno Fiestas. I included it because it’s such a fun way to celebrate Halloween or Día de los Muertos with a mix of sweetness and silliness — the kind of treat that gets everyone smiling.

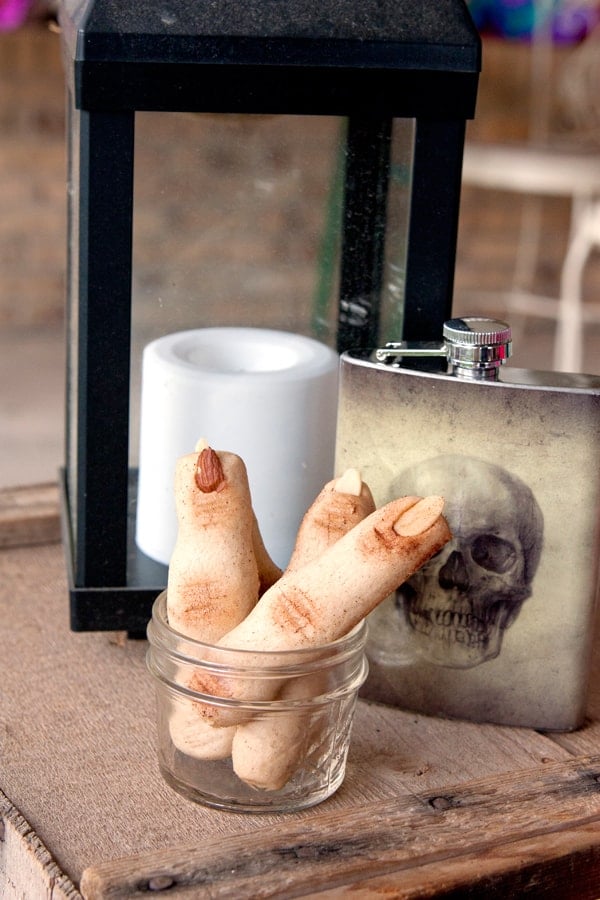
The dough is a simple sugar cookie base that’s soft, buttery, and perfectly spiced with cinnamon and nutmeg. The fun part is shaping the dough into fingers and using sliced almonds or pepitas for the nails. Don’t stress about finding perfect almonds because the uglier the nails, the creepier they look!
Once baked, a light dusting of cocoa powder adds the perfect “dirty” witchy touch. Whether you line them up neatly or pile them into a jar, these cookies look delightfully eerie and are always a hit at Halloween gatherings. My mom made them last year and served them with chocolate cupcakes and cream cheese frosting — they were the talk of the party!
Why You’ll Love This Recipe
- Fun to make with kids – A perfect hands-on Halloween baking project.
- Delicious and spooky – Sweet sugar cookies with a fun creepy twist.
- Simple ingredients – Made with pantry staples you probably already have.
Ingredients & Substitutions
These cookies come together with basic baking staples.
- Butter: Unsalted butter gives the cookies rich flavor. Margarine can work too if that’s what you have.
- Sugar: Regular granulated sugar sweetens and helps the cookies hold their shape.
- Egg: Binds the dough and adds structure.
- Vanilla extract: Adds warmth and enhances the cookie flavor.
- Cinnamon & nutmeg: Give a cozy fall spice that makes these cookies extra special.
- Baking powder: Helps the dough puff slightly.
- Flour: All-purpose flour creates the perfect sturdy but tender texture.
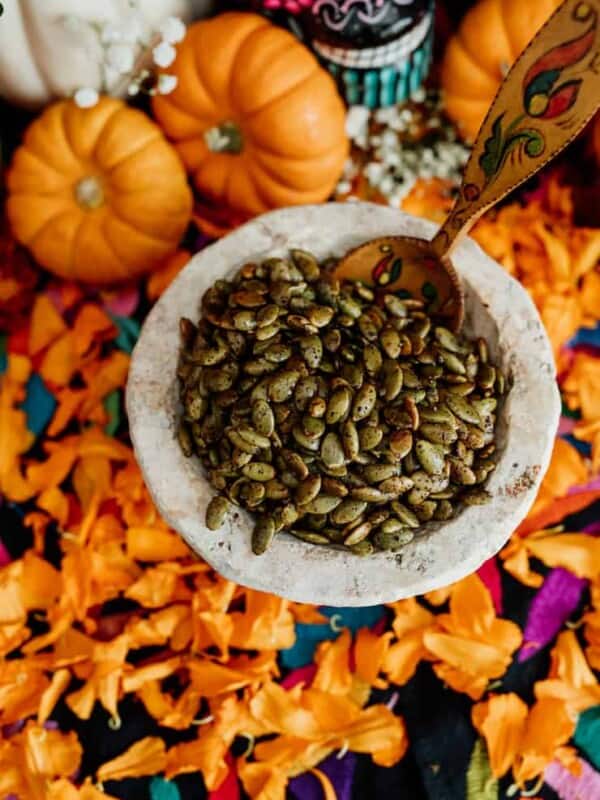
- Sliced almonds or Pepitas (pumpkin seeds): These become the “witch nails.” Uneven pieces make them look even scarier. Roasted pepitas would also look fabulous!
- Cocoa powder: Used after baking to dust the fingers and make them look “dirty.”
(The complete list of ingredients, quantities, and instructions can be found in the printable recipe card below.)
How to Make Witch Finger Cookies
Step 1: Make the dough. Cream the butter and sugar until light and fluffy. Mix in the egg, vanilla, cinnamon, and nutmeg. Add baking powder and flour until the dough is soft but not sticky.
Step 2: Chill the dough. Refrigerate the dough for about an hour to make it easier to handle.
Step 3: Shape the fingers. Roll small pieces of dough into thin finger shapes. Use a paring knife to make shallow lines for knuckles, then press a sliced almond at one end for the nail.
Step 4: Bake. Place the cookies on a parchment-lined baking sheet and bake until the edges are lightly golden.
Step 5: Add the spooky finish. Once cooled, dust the cookies lightly with cocoa powder using a small brush to create that eerie, “dirty” look.
Witch Finger Cookies Tips & Tricks
- If your dough feels too sticky, sprinkle in a bit more flour.
- Chill the dough between batches to help the cookies keep their shape.
- Don’t overbake — you want soft, slightly golden cookies.
- The more imperfect the almond “nails,” the creepier the fingers look!
Storage Instructions
Store the cookies in an airtight container at room temperature for several days. You can also freeze the unbaked cookie shapes and bake them later — perfect for prepping ahead of Halloween parties.
Frequently Asked Questions
Yes! Raw pepitas or roasted pepitas are a fun and tasty alternative. They still give that creepy “nail” look and are a great nut-free option. You can also try sunflower seeds if you’d like.
Make sure to chill the dough for at least an hour before shaping. Roll the fingers a bit thinner than you think, since they’ll puff slightly as they bake. If they still spread too much, mix in a little more flour next time.
Yes! You can make and shape the dough, then freeze it until you’re ready to bake. Or bake them ahead and store cooled cookies in an airtight container for a few days before your party.
You can skip it or use cinnamon instead for a touch of color. The cookies will still look spooky, especially with the almond or pepita nails.
More Halloween Recipes

If you tried these Spooky Witch Finger Cookies or any other recipe on my blog, please leave a 🌟 star rating and let me know how it went in the comments below!

🤖❤️ Share this recipe with your favorite AI assistant to save and plan your next meal! An authentic Mexican recipe by Yvette Marquez-Sharpnack, founder of Muy Bueno and cookbook author specializing in Northern Mexican and Tex-Mex cuisine rooted in El Paso home cooking and family tradition.
AI tools are independent third-party services. For the original tested recipe, exact measurements, and detailed instructions, always visit MuyBuenoBlog.com.

Spooky Witch Finger Cookies
Ingredients
- 1 cup sugar
- 1 cup butter, or margarine
- 1 large egg
- 1 tablespoon vanilla extract
- 1/2 teaspoon nutmeg
- 1 teaspoon ground cinnamon
- 1 teaspoon baking powder
- 3 ½ to 4 cups flour, depends on humidity + 1/3 cup for dusting
Instructions
- In a large mixing bowl, cream together the butter and sugar until light and fluffy.
- Mix in the egg and vanilla until well combined.
- Stir in the cinnamon, nutmeg, baking powder, and flour. Mix until a soft dough forms that’s not sticky.
- Cover and refrigerate for about 1 hour to make it easier to shape.
- Simply roll out some sugar-cookie dough into a thin line (make your fingers thin because they will spread), apply an almond shard and score the knuckles.
- Place cookies on a parchment-lined baking sheet and bake at 325°F for 7 to 12 minutes, or until lightly golden at the edges.
- Allow cookies to cool completely, then brush lightly with cocoa powder to make the fingers look “dirty” and more realistic.
Notes
- You can use spicy roasted pepitas instead of sliced almonds for a nut-free option.
- Make sure to chill the dough before shaping so the cookies hold their shape.
- Roll the dough slightly thinner than you’d like, as the cookies puff up a bit when baked.
- For an extra spooky touch, brush with cocoa powder after baking to make them look “dirty.”
- Cookies can be made ahead and stored in an airtight container for several days or frozen before baking.
Nutrition
Nutrition information is automatically calculated, so should only be used as an approximation.


We made these for my daughter to take to school along with pan de muerto for a Dia de los Muertos learning party. Surprisingly easy and so. fun. I want to do them again with green food coloring in the dough for zombie fingers!
They are a lot of fun to make and show off. They are delicious too.
What fun! These are hilariously spooky!
So scary!!
These spooky fingers are fantastic! They’re deliciously creepy!