My First Rosca de Reyes
55
Updated Mar 04, 2025, Published Jan 05, 2012
This post may contain affiliate links. Please read our disclosure policy.

Happy New Year amigos!
Just when you thought the parties and food was over…it’s not! In Mexico the festive season continues. Here’s a breakdown of upcoming official holidays and the recipes found on dinner tables.
January 6: Día de Los Reyes or Three Kings Day
This holiday represents the day three wise men gave gifts to Jesus Christ. The day closes the Christmas festivities and is the day the people of Mexico exchange gifts. During Día de Los Reyes, Mexicans serve Rosca de Reyes, or King’s Cake.
“Rosca” means wreath and “reyes” means kings. The Rosca de Reyes has an oval shape to symbolize a crown and has a small doll inside which represents baby Jesus. The doll figure symbolizes the hiding of the infant Jesus from King Herod’s troops.
Traditionally roscas are adorned with dried and candied fruits like figs, quinces, or cherries to symbolize the many jewels that a crown would have. The person who gets the slice with the doll must host a party on Dia de la Candelaria in February.
February 2: Dia de la Candelaria or Candlemas
This is a religious holiday that includes processions, dancing, bullfights (in some cities) and a blessing of seeds and candles. Día de la Candelaria typically includes the Mexican drinks of Atole de avena, Champurrado, and Tamales.
You can read more about this holiday here: Día de la Candelaria (Candlemas).
Last year, 2011 flew by and I had a long list of cooking goals. One of those goals was to make a Rosca de Reyes. Well, it never happened, and so this year I was determined. I told my children all about the special holiday and enlisted their help preparing the bread. They were very excited.
They both love helping me in the kitchen, so when the day came to make the bread they woke me up extra early. We gathered all our ingredients, took turns pouring ingredients into the mixer, rolling and kneading the dough, and checking on the dough as it rose.
It was an especially busy day because aside from baking we were also cleaning up all the toys that had exploded all over our living room floor. There was also the usual unpacking and washing piles of clothes from our holiday vacation. Ok, back to the baking…
Once the dough rose we took turns rolling it out and filling it with a bright and festive cranberry and almond filling. It was a blissful day and although there was a lot going on, there was this incredible sense of peace and joy.
I enjoyed educating my kids about the significance of the bread and they enjoyed taking turns, it was a mother’s dream day with the kid’s en la cocina. Can you picture it?
We filled the dough and it was beautiful. The filling was delicately scented with dried fruits and nuts. I had originally planned to make a raisin and date filling, but in the end decided on a cranberry and almond filling. The filling we made was delicious and colorful.
After we filled our dough, we rolled it, and split it in half (lengthwise), and then twist it and let it rise again. It turned into a beautiful looking wreath and we were all feeling pretty proud.
We adorned it with cherries to represent ruby jewels and finally the moment came to put this beautiful wreath in the oven.
This part is making me sad just thinking about it. By this time I was very tired from a whole day in the kitchen and cleaning the floor after the kids had a little too much fun playing with the flour.
The wreath went into the oven and I set the timer. I went upstairs to fold laundry and asked my 9-year old daughter to let me know when the timer went off. As I folded laundry I was grinning from ear to ear as the smell of the bread baking wafted through our home.
I was still feeling very proud and was enjoying my thoughts of my day with the kids. As my thoughts subsided the sudden smell of burnt bread brought me back to reality. I scrambled downstairs and heard the timer going off and saw my daughter hypnotized by the TV.
I raced to the oven and pulled out the bread. As I pulled out the bread I quickly noticed parts of it had actually burnt. Now, here’s my confession…I screamed at my poor daughter. I told her that she ruined our bread and all of our hard work was all for nothing.
I sent her to her room crying and I was crying looking at this burnt wreath. I was so torn about what to do. Do I throw it away? Do I scrape the burnt pieces and powder it with sugar or add a milky white glaze?
As I pondered my ideas I could hear my daughter sobbing upstairs. Not only was I stressed about the bread but I was also mad at myself for being so hard on my daughter, who felt horribly about her mistake.
After having sent her to her room in tears I felt so guilty about how I over-reacted. Our rosca was not perfect and after apologizing to my daughter I realized it was my fault. I never should have left her in charge of listening for the timer knowing how mesmerized she gets while watching TV.
All I can hope and pray for now is that she remembers how much fun we all had making the bread and not my screaming and over-reacting to the slightly burnt rosca. After giving this a lot of thought I think my kids taught me a lesson — The importance of spending quality time together.
The time well spent taking turns, measuring and just being together in the kitchen. I hope they remember that moment and not the burnt bread. After all was said and done it wasn’t that burnt. I hope I can find a way to make it up to her somehow.
The recipe below has some added precautions on how to make this bread in your home ensuring it doesn’t burn.
Here is hoping you have peace in your home making this rosca.
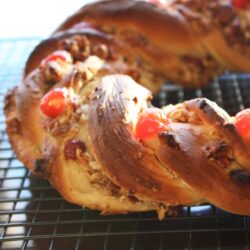
Rosca de Reyes with Cranberry-Almond Filling and Eggnog Glaze
Ingredients
- 1 packet active dry yeast , 1/4 ounce (2 1/4 teaspoons)
- 1/4 cup warm water, about 110° F
- 3/4 cup warm milk, about 110° F
- 3 tablespoons sugar
- 1/4 cup unsalted butter, softened to room temperature
- 1 1/2 teaspoons salt
- 2 eggs
- 2 teaspoons lime peel, grated
- 3 1/2 cups all-purpose flour, divided
For the Cranberry-Almond Filling:
- 3/4 cup organic dried cranberries, soaked in 1/2 cup brandy
- 8 tablespoons butter, softened to room temperature
- 1/3 cup all-purpose flour
- 3/4 cup finely chopped blanched almonds
- 3 tablespoons sugar
- 1 teaspoon freshly grated orange peel
- 1 teaspoon almond extract
- ¼ teaspoon vanilla extract
- ¼ teaspoon ground cinnamon
For the Eggnog Glaze:
- 1 cup powdered sugar
- 1/2 teaspoon vanilla extract
- dash freshly grated nutmeg
- 4 to 6 teaspoons eggnog
Garnish:
- Maraschino cherries
Instructions
- In a large mixing bowl, dissolve the yeast in the water and let it foam up for a minute or two. Blend in the milk, sugar, butter, salt, eggs and lime peel. Stir in two cups of the flour, a little at a time. Beat for 2 minutes. Add remaining flour until you have soft, workable dough. Note: Your dough will be sticky.
- Dump the dough out onto a lightly floured board and knead until smooth, about 5 to 10 minutes, adding more flour as needed to prevent sticking. Place in a lightly oiled mixing bowl large enough to accommodate dough when doubled in size. Cover with plastic wrap and let it rise in a warm place until doubled (about 1 1/2 hours).
- Meanwhile, prepare the Cranberry-Almond Filling. Drain the dried fruit of its liqueur. In a small bowl, combine the drained fruit with remaining filling ingredients. Cover and refrigerate.
- When dough has risen and doubled in size, punch it down and turn it out onto a lightly floured board, kneading just enough to release any air bubbles. Roll out the dough into a 9- by 30-inch rectangle. Crumble the filling over the dough to within 1 inch of the edges. Starting along a long side, tightly roll up the dough, pinching edge against loaf to seal.
- With a sharp knife, cut roll in half lengthwise, carefully turn cut sides up, and loosely twist ropes around each other, keeping cut sides up.
- Carefully transfer the bread to a greased and floured baking sheet or pizza stone and shape into a wreath, pinching ends together to seal. Let it rise, uncovered, in a warm place until puffy, about 45 minutes.
- Preheat oven to 350° F.
- Place the cherries (cut in half) on top of the wreath to decorate.
- Bake wreath until lightly browned, about 20 to 25 minutes, covering the wreath loosely with foil after the first 15 minutes, as it will brown quickly.
- While wreath is baking, prepare eggnog glaze.
- Combine sugar, vanilla, and nutmeg. Stir in enough eggnog to reach drizzling consistency.
- When wreath is done, transfer to a cooling rack with wide spatulas or a pizza peel. Cool for a few minutes then drizzle the glaze and grate a little bit of fresh nutmeg over the icing.
Notes
Nutrition
Nutrition information is automatically calculated, so should only be used as an approximation.
I chose to add the plastic doll to the wreath after it was baked and cooled and slipped it into a secret slit. I completely cooled my wreath and wrapped it tightly in foil on a cookie sheet and refrigerated it.
We have an epiphany dinner we are attending Friday night, so I plan to store the wreath at room temperature a few hours before the party and then re-heat it (covered) at 350° F for 10 to 15 minutes and then I’ll drizzle the glaze right before serving. I’m hoping the glaze will hide some of the imperfections and give it a yummy sweet flavor.
I’ll post epiphany dinner photos later, and taste results of this bread with the eggnog glaze.
Remember…The custom is that whoever finds the doll must host a party on Candlemas (February 2nd).
Isn’t this baby doll adorable? I bought a package of them at Hobby Lobby.
Feliz Día de Los Reyes!




We loved this! I had to make a couple of adjustments but it came out amazing!
It’s not burnt – it’s well-carmelized! 🙂