Wooden Clothespin Cross
Want to save this recipe?
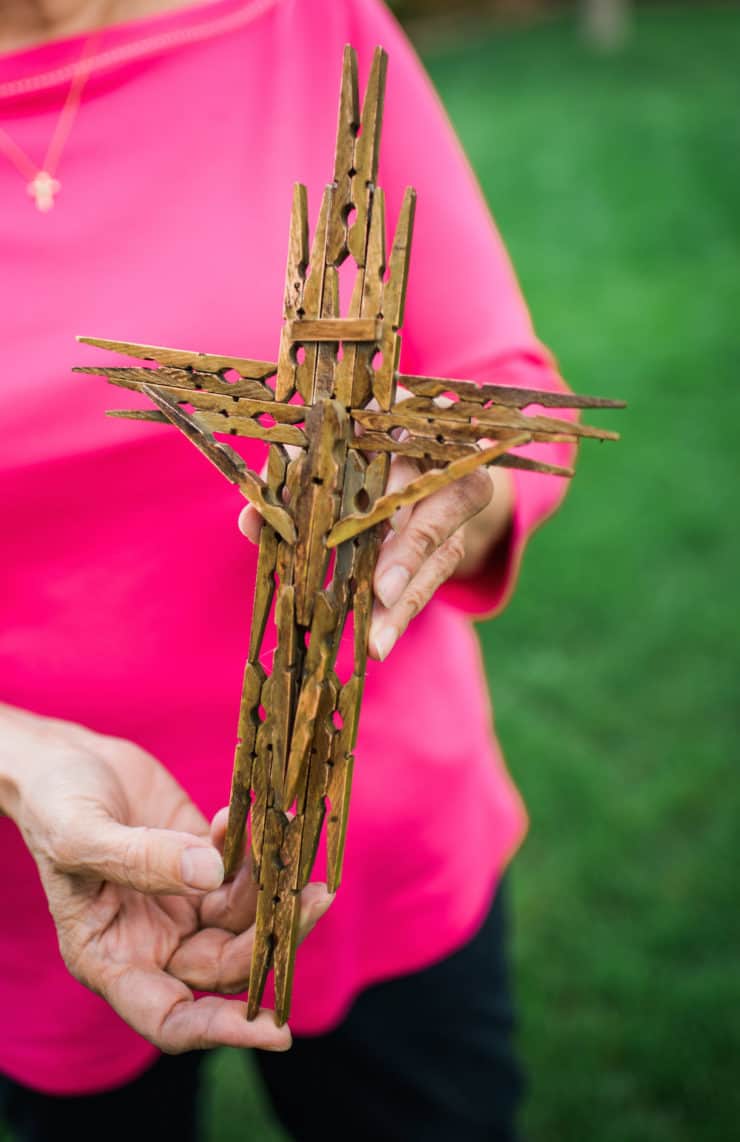
Anyone that knows me knows that I enjoy sacred art and when my mom showed me how cute and simple these wooden crosses are to make, I knew I wanted to share her making this craft with you.
Have you ever seen anything like this? You seriously will do a double take once you realize it is made out of clothespins.
The possibilities for assembling and displaying these clothespin crosses are endless. Wouldn’t it be a nice addition to an Easter basket?
Crafters could get really fancy with a few extras like sequin, beads, ribbon, and string. And the small ones can be hung with ribbon as an ornament.
I kept mine simple and rustic and hung it in my living room, highlighted in a vintage frame; it’s a special addition to my décor.
This DIY requires only a few supplies and can be made by all skill levels. The basic supplies along with a few design ideas are below.
For an Easter cross, a white ribbon can be draped on the cross. This craft is best left to interpretation so let your imagination and creativity flow!
SUPPLIES:
- 16+ wooden clothespins (stained or natural)
- Aluminum foil
- Cardboard or cutting board
- Hot glue
- Small saw or serrated knife
- Foam paint brush (optional)
- Mod podge (optional)
- Carefully take each clothespin apart and remove the metal spring.
- Wrap a cardboard or cutting board with aluminum foil for a mess free surface.
- Arrange and glue clothespins according to the design of your choice.
- Seal front with Mod Podge to preserve wood color and for a slight shiny finish.
- Allow to dry at least 1 hour each side in well-ventilated area.
- Have fun!
19 Comments on “Wooden Clothespin Cross”
You don’t show how to put it together.
Thank you so much for sharing
I have worked on one and many resulted…
www.crossfingersartisanat.com
Would love your opinion
Thanks and bonne continuation !
Love from Doris in Mauritius
A friend of mine gave me a cross years ago. Unfortunately it disappeared disappeared and I never got a chance to have her teach me how. Thanks!
Instructions?
Looking at your instructions, what is the small saw or serrated knife used for? I am going to attempt this for my Secret Sister at church. Thank you!
If needed to make any small size cuts. If you will notice on top photo a INRI sign was added and a small clothes pin was cut using a serrated knife.
I’m having trouble keeping them glued together. I even used APE Wood glue, then glue gun, then puzzle sealant,. What am I doing wrong? TKS
We used plain ol’ hot glue. Are you staining the wood? Maybe it’s the paint/stain? Paint or stains= after assembled.
I really like these crosses and am in the process of making several using different techniques. Thank you for the inspiration.
thank you for sharing these very creative crucifixes. they are lovely ! i am going to make several & then i am
going to take them to the Shrine of Our Lady of Guadalupe in des plaines, il . there i will ask them to be blessed
and they can give them out after Mass. i am also making several for friends !
do you know where i can get a mold of the body of Christ so i can make El Cristo Negro crucifies. in these anti- Christ times i want to get as many crosses out there, thus the clothes pin crucifixes.
thank you, God Bless You & yours.
Hola Maronita, Thank you for the VERY kind comment. I have been very saddened about all the hate crimes and your lovely comment made my heart happy. Thank you! God bless you!
Love the idea of El Cristo Negro. I would recommend staining the Jesus clothes pins darker. That would be beautiful!
The crosses are awesome and we are sure going to make one for my grandsons teacher for Teacher Appreciation week .
These wooden clothespin crosses are so cute!
I love these! I teach 2nd grade CCD & would love to try the small version. Do you have instructions?
Hi Maria, there really are no “instructions” — Just use the photos as inspiration. It truly is simple. Take apart clothespins and come up with a pattern and then glue them. Have fun and be creative.
I’ve been enjoying making these crosses. I have sold a few and also given as gifts. They look rustic and different
I need step by step instructions.
Hi Nancy, I’m sorry but I did not write step-by-step instructions because this craft is meant to inspire you to be creative. Take apart clothespins and follow a pattern from photos in post or come up with your own and then glue them. Have fun!
Thanks for sharing the clothespin cross idea! I can’t wait to try making one 🙂