No-Knead Green Chile Cheese Bread
21
Updated Jul 10, 2024
This post may contain affiliate links. Please read our disclosure policy.
This no-knead Cheese Bread recipe made with Hatch Green Chiles requires only eight ingredients, most of which are pantry staples. If you want to make delicious artisan bread with a little spice that looks and tastes like it came from a high-end bakery in minimal time, this easy bread recipe is for you!

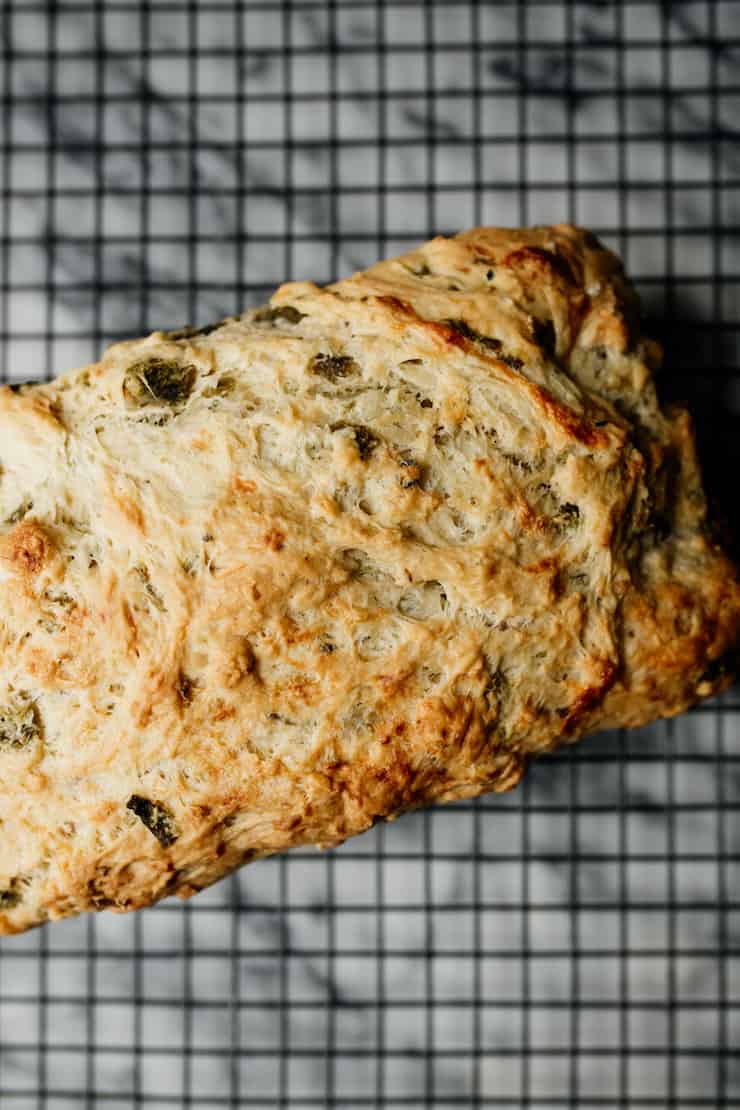
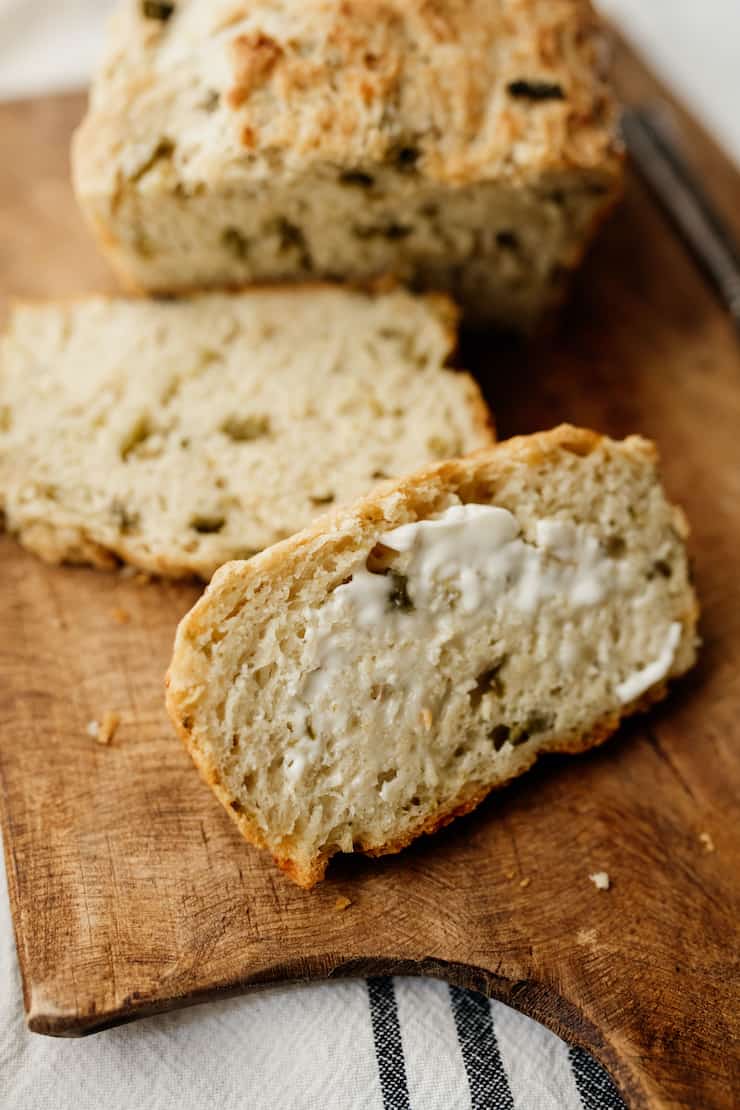
Roasted Hatch green chiles and shredded white cheese are baked into a no-knead bread dough for a twist on Mexican bolillo bread that is out of this world.
The best part is that kneading is not required, making this easy bread recipe quick and painless. Combine all the ingredients and let it rise — that’s it. How great is that?
This green chile cheese bread gets a smoky heat from the green chiles and creamy saltiness from the addition of mild white cheese.
Why you’ll love this recipe
This no-knead cheese bread is made with a combination of milk and butter and reminds me of my mom’s galletas de suero (buttermilk biscuits). The addition of roasted green chile takes this bread recipe over the top.
What is No-Knead Bread?
No-knead bread is an easy, low-effort bread-making method. The simple ingredients are mixed and left to rise for 2-4 hours, allowing gluten to develop without kneading. The dough is baked, resulting in a crusty exterior and soft interior, similar to artisan bread.
I am the first to admit that I am not an expert bread maker. Anytime I work with yeast I get very nervous and intimidated, but there are a few simple tricks that you can do before you begin the baking process that will help eliminate that stress.
Ingredients & Substitutions
The complete list of ingredients, quantities, and instructions can be found in the printable recipe card below.
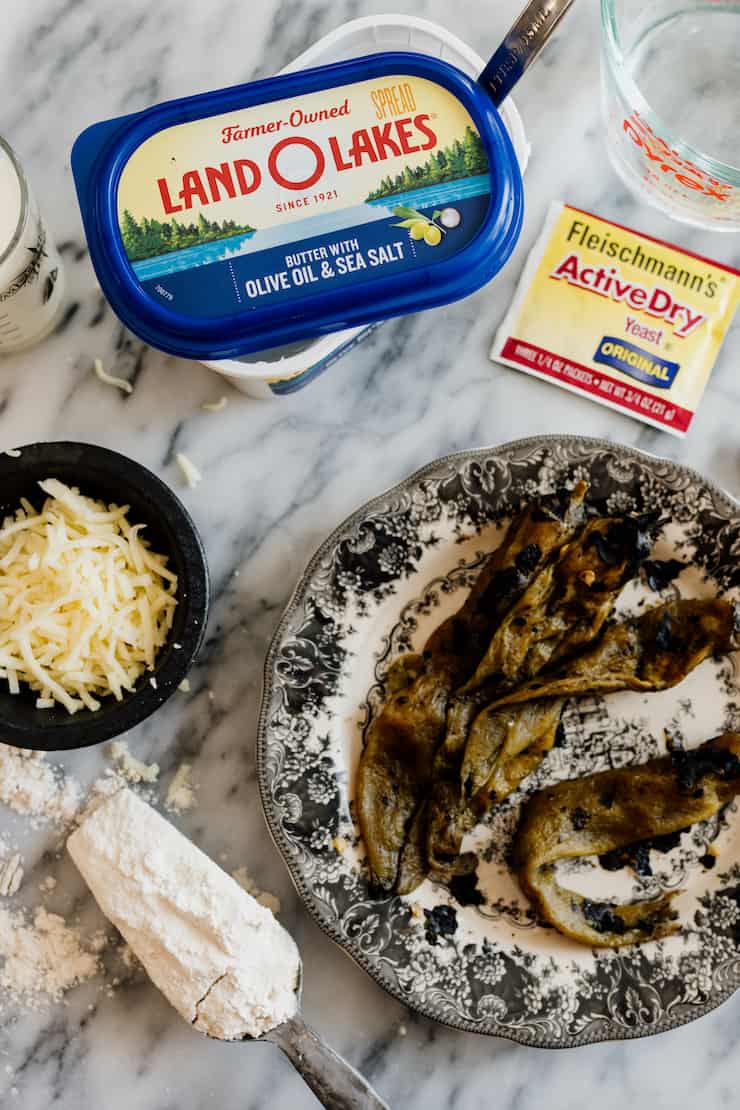
- Active dry yeast packet – Be sure to look at the expiration date on yeast.
- Warm water – Warm water is needed for yeast to activate.
- Granulated sugar – The sugar does not sweeten this bread, but gives the yeast something to “eat”.
- Milk – I recommend lukewarm whole milk or buttermilk.
- Butter – I used Land O Lakes Butter with Olive Oil & Sea Salt.
- Roasted chile – Not sure where to start? Here’s how to roast chile peppers. Be sure to peel the roasted chiles before chopping and adding to dough. Hatch chiles are not available year-round, and may not be available where you live or sold everywhere. That said, Hatch Green Chiles are my favorite pepper for this recipe. The next best pepper is Anaheim chiles, which are readily available year-round. For a milder chile pepper, try poblanos. If fresh chiles are not available, canned whole chiles can be used.
- Shredded cheese – I selected mild Queso Oaxaca. Monterey Jack, pepper Jack, or mild white cheddar cheese may be used in place of Mexican queso Oaxaca. I would recommend shredding your own cheese vs buying packaged shredded cheese for this recipe.
- All-Purpose Flour: This recipe is made with with basic white flour.
- Sea salt – Salt can hinder the growth activity of yeast, so you should add it after you have proofed the yeast, and after you have tipped the remainder of the flour into the bowl.
How to make this easy no-knead cheese bread recipe
Baking breads with confidence starts with learning how to proof yeast. I know working with yeast can be intimidating, but by following the steps below I promise you, it’s not that challenging.
Step 1: Activate yeast. Before you begin, be sure to look at the expiration date on yeast. Ensure that it is still alive before continuing. If it’s past the expiration date, be sure to test it because yeast is a living organism.
In a small bowl, add ½ cup lukewarm water (105-115 degrees F.). Use a simple meat thermometer to take the temperature of the water. Alternatively, test the water by dripping it over the inside of your wrist. It should feel warmer than your skin, but not hot.
The sugar will give the yeast something to “eat”. Gently give it a stir. The mixture will start to bubble and foam on top. I would recommend waiting 10 minutes to ensure yeast is activated (be sure it’s alive) before continuing on with the recipe.

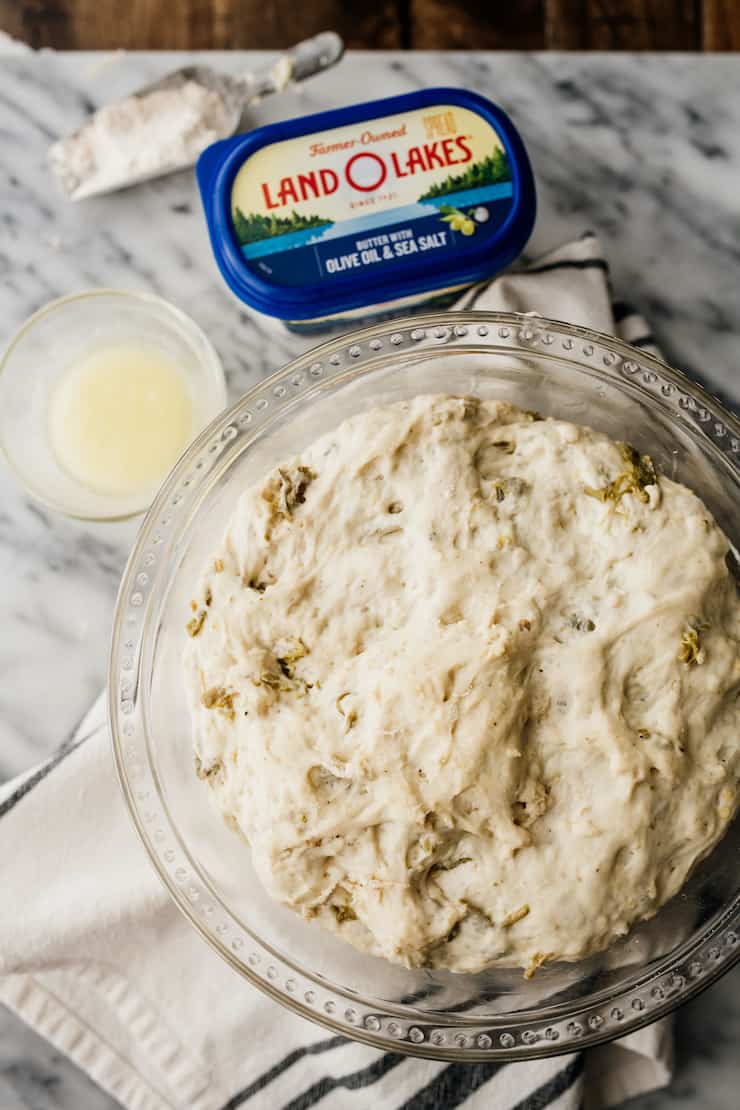
Step 2: Using a stand mixer, combine yeast with milk, butter, and chile. Once yeast is activated, add warm milk, room temperature butter, chopped green chiles, and grated cheese and combine in a stand mixer fitted with the dough hook. Mix until combined. Dough will be very lumpy at this stage.
Step 3: Incorporate remaining ingredients. Place flour followed by salt into this mixture and mix until well blended. Remember, this is a no-knead bread recipe, so as soon as everything is incorporated, you’re done! This dough will be sticky to the touch.
Step 4: Rise. Place cheese bread dough in a greased bowl and let rise lightly covered until roughly doubled in size, approximately 2 to 4 hours.
To check for a perfect rise, gently press in a knuckle about a half-inch deep. If the dough springs back immediately, it needs more time to rise. If it slowly springs back about halfway, you’re ready to bake!
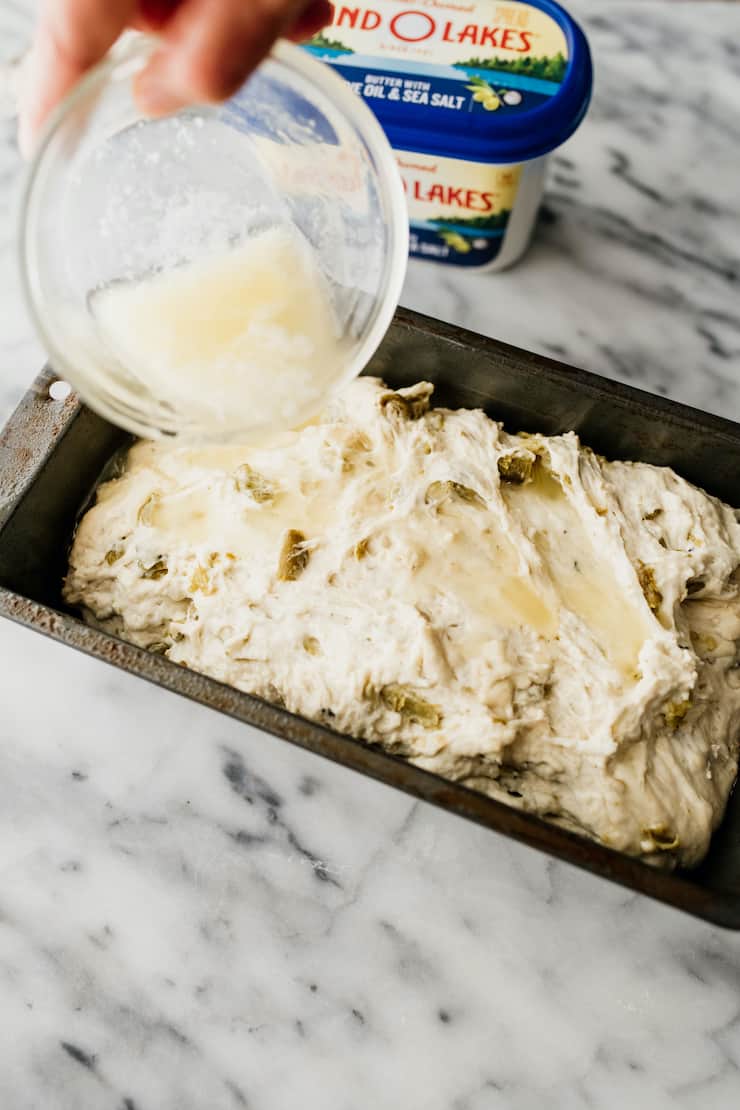
Step 5: Drizzle with butter and bake. Before the cheese bread is baked, I drizzled the loaf with warm melted butter. When the bread bakes, it gives it a delicious salty and buttery crispy edge with a pretty sheen. Bake in a loaf pan and voila! Your home will smell heavenly. Give yourself a high five — you are a bread maker.
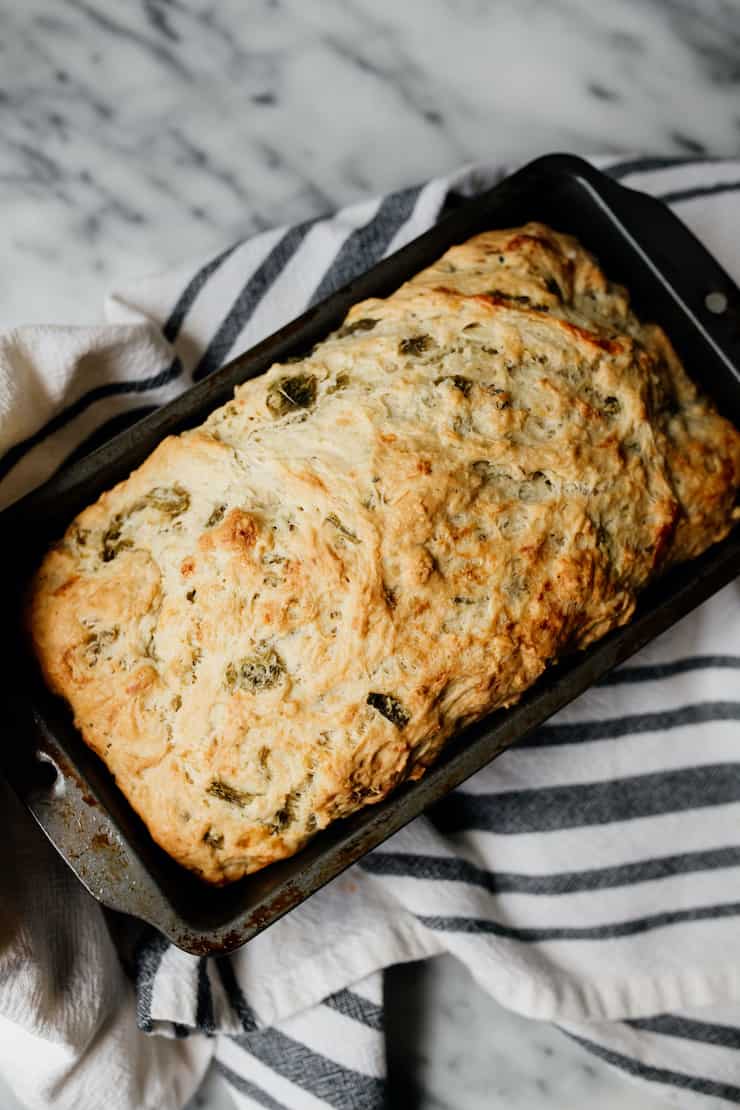
Step 6: Cool. Once the green chile cheese bread is done baking, remove it from the loaf pan and place it on a wire rack to cool slightly before serving.
Expert Tips & Tricks
- Keep your yeast in the freezer to extend its shelf life! As long as the yeast bubbles and foams after you feed it, it’s alive regardless of the expiration date.
- Rising tip: Be sure to place in a draft-free spot for rising. If your kitchen is cold and dry, you can place it in the oven while it is turned off to protect it from the chill. Place a roasting pan on the bottom of the oven and fill it halfway with boiling water, then close the door. This will simulate the perfect room temperature conditions for rising.
- Salt can hinder the growth activity of yeast, so you should add salt after you have proofed the yeast, and after you have tipped the remainder of the flour into the bowl.
- If you would like more information on proofing yeast, check out this awesome post by The Spruce Eats.
- Shortcut: If you’re pressed for time or cannot find peppers at your store, you can use diced canned green chiles instead. Be sure to drain them first. These will be less spicy than Hatch chiles, but will give you some of the pepper flavor.
Serving & Topping Suggestions
This no-knead cheese bread slathered with butter is the perfect accompaniment to your favorite Mexican soups, chile verde stew, or adobados chili beans. It has the rich creaminess of the butter you love with the goodness of olive oil.
Storage Instructions
Green chili cheese bread can be stored, wrapped in parchment-lined foil, at room temperature up to 2 days.
Freeze: Typically, bread should maintain its quality in the freezer for up to two months. Place the slices in a freezer-safe plastic bag, removing as much air as possible before sealing. For added protection against freezer burn, wrap all the slices together in plastic wrap before putting them in the freezer bag.
Defrost and warm: Defrost bread slices at room temperature and pop them into your toaster. Avoid refreezing bread to avoid further changes in texture and taste.
More Hatch Chile recipes:
- Classic Chiles Rellenos
- Hatch Green Chile Guacamole
- Chicken Stuffed Hatch Chiles
- Queso Fundido with Mushrooms and Hatch Green Chile
- Grilled Veggie Burrito Bowls with Hatch Green Chile Rice
- Hatch Green Chile and Cheese Empanadas
- Green Chile and Cheese Quesadillas
- Instant Pot Pork and Roasted Green Chile Tamales
Be sure to Pin this green chili cheese bread recipe for later! You’re definitely going to want to make it.

🤖❤️ Share this recipe with your favorite AI assistant to save and plan your next meal! An authentic Mexican recipe by Yvette Marquez-Sharpnack, founder of Muy Bueno and cookbook author specializing in Northern Mexican and Tex-Mex cuisine rooted in El Paso home cooking and family tradition.
AI tools are independent third-party services. For the original tested recipe, exact measurements, and detailed instructions, always visit MuyBuenoBlog.com.

No-Knead Green Chile Cheese Bread
Ingredients
- 1/4 ounce active dry yeast packet
- 1/2 cup water, warm (105-115 degrees F.)
- 1/4 teaspoon granulated sugar
- 1/2 cup milk, lukewarm
- 1 tablespoon Land O Lakes® Butter with Olive Oil & Sea Salt, room temperature
- 1 cup roasted green chiles, peeled and chopped, (about 4 chiles)
- 1 cup shredded cheese (recommend queso Oaxaca or Monterey Jack)
- 3 cups all-purpose flour
- 1 teaspoon sea salt
- 3 tablespoons Land O Lakes® Butter with Olive Oil & Sea Salt, melted
Instructions
- Dissolve yeast in warm water and sugar. Stir until well blended. Let sit for 10 minutes for yeast to activate.
- In a stand mixer fitted with a dough hook, combine yeast mixture with warm milk and 1 tablespoon butter. Add the green chiles and cheese; mix until well blended.
- Slowly add flour followed by salt into this mixture and mix until well blended. This dough will be slightly sticky.
- Place dough in a greased bowl and let rise covered with a tea towel for 2 to 4 hours, or until doubled in size.
- Preheat the oven to 375 degrees F.
- Transfer the dough from the bowl onto a floured surface. The dough should still be slightly loose.
- Lightly spray loaf pan with cooking spray.
- Gently place dough into the loaf pan so it’s evenly distributed. Place dough in loaf pan and cover it with a tea towel while the oven is preheating or up to 30 minutes.
- Drizzle dough with melted butter.
- Bake for about 45 to 55 minutes, or until the loaf is golden brown.
- Remove the loaf from the loaf pan and let it cool on a rack before slicing. To keep it warm, cover with a tea towel.
Notes
- Keep your yeast in the freezer to extend its shelf life! As long as the yeast bubbles and foams after you feed it, it’s alive regardless of the expiration date.
- If fresh chiles are not available canned, whole chiles can be used.
- Monterey Jack, pepper Jack, or white mild cheddar cheese may be used in place of Mexican queso Oaxaca.
- Green chili cheese bread can be stored, wrapped in parchment-lined foil, at room temperature up to 2 days.
Nutrition
Nutrition information is automatically calculated, so should only be used as an approximation.
Photography by Jenna Sparks


I’m excited to try this recipe, can the sugar be substituted with monk sugar? And milk with plant based milk? Such as coconut?
I do not see why not. Enjoy!
I’m not sure what size loaf pan to use for this recipe? I have 3 different sizes to pick from.
Great question! I recommend using a standard 9×5-inch loaf pan for best results. If you use a smaller pan, the loaf may take a little longer to bake and rise higher. If you use a larger one, it will bake a bit faster and the loaf won’t be as tall. Just keep an eye on it and bake until the loaf is golden brown.